It’s that time of year to get outside and landscape. You
have an idea of what looks nice, but we all have that neighbor who went
overboard. Don’t be that neighbor and take note of some of these landscaping
mistakes.
1.
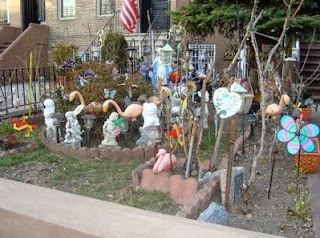
Excessive
lawn ornamentation. Need we say more? Stick to a theme and make sure those
ornaments fit the rest of your landscaping design. If you must, sick to one
statement, as opposed to ten (or more).
Photo Cred: privateandpublicspace.wordpress.com
2.
Planting
in the wrong locations. Many people don’t heed the warnings and read the
directions on the plant tags. They’re there for a reason! Make sure you’re
planting new items in the right places. HGTV’s
Plant Finder is a great
tool to double check seasonality, light exposure and hydration needs.
3.
Short
grass. It’s a myth that cutting grass shorter will yield less time out
mowing throughout the season. It’s actually the opposite, and you can end up
doing more harm to your lawn. Exposing too much earth can cause bare patches
and dryness, and it also opens the door for insects to make homes.
4.
Incorrect
potting. Large planters are all the rage, but it’s easy to incorrectly
plant items when you feel like you have a lot of space. Make sure you’re not
planting a plant in a pot that’s too large, as it can sink down causing it to
get too much water (or the opposite – dry out too fast).
5.
Blotchy
lawns. Caused by improper or non-existent fertilization, a spotty lawn can
really be an eye sore. Visit a Home Depot, Lowes, or local garden center and
ask for a professional’s help with fertilization. Let them know how much (and
why type) of sun your lawn gets and what types of fertilizer will work best.
Fertilizing should be done at least twice per year, never in the bright sun,
and with a good long soaking.
6.
Not
taking animals into account. New York is a beautiful place to live, there’s
no doubt! But in living in such a lush, green area, we also have our fair share
of critters that frequent our properties. From deer to birds to rabbits, each
are in search of tasty treats that are easily accessible, so make sure you’re
not planting items that they love, otherwise you’ll end up with chewed up green
stalks and no color.
7.
Overgrowth.
Again citing our trusty HGTV tool, Plant Finder, make sure the plants you
choose are the right plants for the areas they’re being planted in. Keep in
mind, some plants grow very quickly and can span large areas. While the color
may be what you’re looking for, the size may really hinder the overall
appearance of your home.
8.
Too.
Many. Colors. Pick a color theme and stick to it. Coherence in your color
palette will create harmony and beauty, while a cluster of colors will be just
that – a cluster.
9.
Not
family-friendly. Some people get carried away with ornamentation themes in
their yard for visual appeal, but forget about usability. After all, you’re
paying taxes for the land your house is on so you ought to be able to use some
of it, right? It’s best to start off with a list of what you want to be able to
do in your yard and go from there, design-wise.
10. Sticker shock. It’s easier to start a
project than it is to finish it. But sometimes, without proper project
estimation, we can get carried away with the cost of finishing the job, leaving
it partially or totally uncompleted. Get a budget and estimate together before
you get started, so your project gets completed and looks nice sooner rather
than later!