Showing posts with label diy. Show all posts

Thursday, July 23, 2015

You Can’t Kill It: Shrubs


Roses from your significant other. Potted plants from your mother. It doesn’t matter. You kill everything with your not-so-green-thumb. It’s OK, you’re not alone. That’s why this month, we’re featuring a series of blogs on plants you cannot kill (or at least you’ll have a hard time killing them).

Don’t be “that house” on the street. Grab your gardening gloves and toss-around shoes. This week we’re featuring our favorite shrubs that you cannot kill.

Japanese Flowering Quince
Otherwise known as the “Pink Lady,” this flowering shrub gives your landscaping a blast of color, even into late winter. If you’re in need of a hedge and love colors like pink, coral, bright orange or even white, this shrub is perfect for your space. The flowering quince works well in wildlife gardens, so if your property backs up to trees, the dense interiors will provide great shelter for birds.

Black Beauty Elderberry
If high-contrast is what you’re hoping to achieve with your landscaping, the Black Beauty Elderberry might be the shrub for you. Its beautiful dark leaves are complimented with pink blooms which appear mid summer, followed by berries. You won’t want to eat the berries, however if you love birds, you’ll notice they’re drawn to these berries.

Rose Satin
More popularly known as a hibiscus, the Rose Satin brings beautiful, bold color through huge blooms in colors such as white, red, lavender and pink. If birds aren’t your cup of tea, but you prefer the likes of butterflies and hummingbirds, you’ll find they are attracted to the Rose Satin.

Photo Cred: gardengatenursery.com

Bridal Wreath Spirea
This mid-spring blooming shrub forms a beautiful fountain of white flowers, which linger on for about a week. It’s an extremely low-maintenance shrub, but it just needs room to spread, so the branches can do what they do best: cascade (and take up a ton of room in your yard so you don’t have to worry about planting a huge variety of other plants).

Bridal Wreath Spirea is best combined with perennials, so if you like this shrub the most, stay tuned to our blog next week on perennials that you cannot kill.

Friday, May 15, 2015

5 ways to boost curb appeal


You’re ready to make the leap and start designing your dream home. The checks are signed, deposit is made, floor plan is chosen, but there’s just one thing standing in your way: your current abode. It needs some work, no doubt, but what are the most important things to update to get that instant curb appeal, setting it apart from other properties in your area?

Photo Cred: pinterest.com
Here are five of our favorite easy updates that won’t break the bank.

Tidy Up! Many families opt for using the garage door as the home’s main entrance, but delivery drivers, pizza guys, and solicitors still access your front door. You’d be surprised how quickly little pieces of paper, delivery post-its, phone books and flyers pile up. Take a day and make sure the porch is clean and tidy. This will give guests a clear, clean view of your home.

Scrub-a-dub! Grab a broom, rent a power washer, and stock up on Windex. Start by giving siding a good power wash, removing dirt and grime and animal/bug debris. The power washer is also helpful for removing weeds from driveway cracks, so keep it handy if need be. Once the house has dried off, use a push broom to remove debris from your front porch, patio, walkways and driveway. After you’re done, clear off those windows, as this will let more unfiltered, natural light into your home.

Paint. You don’t have the paint the whole house (unless you want to), but a new coat of paint on your front door will do wonders for the overall appearance. Opt for a similar color to what you have, or spice things up with a dark blue or brick red for extra pizazz.

Grab some mulch. It’s amazing how a coating of mulch can completely transform the outside of your home. Just add a 2” layer around all flowerbeds, mailboxes, and trees about two weeks before your first showing. Mulch also helps trap in moisture, so you’ll be doing what bushes and flowers you have planted a favor, giving them a much-needed boost. If you have a lot to cover, consider purchasing mulch in bulk as this will be cheaper in the long run.

Plant TLC. Overgrown yards are not attractive, we all know that, but trees and shrubs can really add to the overall appeal of your home if they’re cut properly. Make sure branches aren’t touching the home (as this can actually cause siding damage and a gateway for critters to enter your home), and bush height should never overshadow a window, hindering natural light indoors.

Building a walkway


Faber Homes recommends waiting a couple years after moving into your brand new home before building patios or walkways in order to accommodate for settling. Once that time has passed, stones and other poured materials have a better chance of staying where you put them. So you’re ready to get started? Here is an easy how-to guide on assembling your new stone path.

First, lay out your path using string and stakes, and begin by digging the soil deep enough for the base, leveling as you go. Measure the space you’ve created so you’re accurately able to order gravel, sand and other supplies. Once you’ve cleared the space, shovel gravel in and compact it using a plate tamper after raking the space smooth. If you don’t have a tamper, you can rent one for between $25 and $50 per day. 
Photo Cred: houzz.com

Next, take the sand you ordered and cover the gravel with a 1 to 2 inch layer. Use a rake to smooth the surface and finish this step by running a string between two stakes to show where the finished path space will be.

Now is the fun part. Grab your stones and fit them close together along the path with quarter-inch gaps between each piece. Once your stones are placed where you want them, use a rubber mallet to set each stone in the sand. Finish by using a level to ensure all stones are level with each other and the string.

Using sand or rock dust, fill the gaps between the stones and set it by spraying the whole walkway with water. If the stones are still elevated, add another layer of sand (and spray with water) until everything is level. You can opt to add a sealant to ensure sand doesn’t make its way off the path and into your yard or home. This will also help to prevent bricks, stones or pavers from spreading and moving around where you don’t want them.

Send us your final project pictures on Facebook and we’ll feature them on our page! Good luck!

Tuesday, April 14, 2015

Upcycling furniture


Stop! Don’t throw that old furniture away! We’re about to list off some great tips on how to rehab that old dresser and make it new and functional again – no need to go buy something new when you can recreate something totally unique and beautiful.


You’ve seen them on shows like American Pickers – old giant convenience store signs make for interesting headboards. Just make sure they get a good cleaning first.

Take a drab dresser and turn it into a stylish piece of art. Here are some tips on how to incorporate chevron stripes and add a pop of color to your bedroom. Not a fan of chevron? Here are some tips on how to paint flowers on your dresser using wood ice cream sticks.

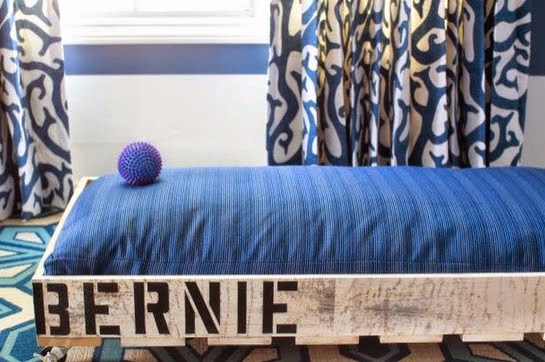
Turn old wood shipping palates into functional dog beds that won’t (completely) tear to shreds.

Photo Cred: HGTV
Find wrapping paper patterns that work for your space and decoupage them on your desk or dresser.

Vintage dressers might seem outdated, but have you ever thought about using one as a bathroom vanity?

Give those drawers a makeover. Paint that old dresser and grab some house numbers and use them as the handles.

Drawers too far beyond repair? Just tear them out and try a new side table design like this one.

Barn wood door turned into headboards can be exquisite. Here’s an example that isn’t too difficult.

Here’s one of our favorites. Grab that big old dresser, give it a paintjob and behold: everyone in the family now has somewhere to store their own shoes, hats and gloves in the mudroom.

Do you have some furniture rehab favorites? Share them in the comments below. Find these ideas and even more on our Pinterest board!

Monday, January 19, 2015

Kitchen Organization

It’s easy to have your kitchen cabinets get out of control. Each week you’re probably going grocery shopping and adding more to the mix, then the husband goes looking for something (or the kids do), and your organization method has gone out the window. Fool-proof that cabinet with some of these tips.

Grab and go sacks are a lot easier when you prepare them in advance. This way, you have less little hands grabbing handfuls of pretzels, fruit snacks, or crackers. Find see-through baskets with handles and organize smaller items like snacks, dinner sides, pasta and sauces. Label the containers if you’re able, so there will be no excuses (less excuses?) for lack of organization.

Photo Cred: tidymoms.net

Many organizers often forget about useable space on the pantry door. Utilize that space to store canned goods, soda and more. You’ll be surprised how much extra room you’ll have in the pantry, and how much easier it will be to take inventory of what canned goods you have on hand.

Boxes upon boxes of pasta, candies, and baking goods. It seems the supply never ends, until you go to make something for dinner and realize you’ve run out. Use glass containers to store and display dried goods and keep track of what you have and what you need to buy on your next grocery run.

You can easily double your cabinet space by investing in hanging, attachable under-the-shelf racks. Store dinnerware, smaller boxes, napkins, or even utensils.

Pots and pans and their corresponding lids never fit well in any cabinet it seems. Invest in lid organizers that either sit in the bottom of a cabinet space or attach to the inside of the cabinet door. Save even more space by finding unique ways to hang pots and pans, such as above a large window or from an island light fixture.

Use small curtain rods to hang bottles of cleaning supplies below the sink. You’ll save room for other items, and have a better idea of what supplies you have and what you need to buy the next time you’re out.

New Tools for 2015

Cutting through the clutter at Home Depot and Lowes can be a tough task. There are so many tools and gadgets that make the job “easier” but it’s hard to know for sure what you’re getting.

2014 was a great year for product development so we’ve pulled together a list of tools and gadgets we think will help make your life easier, at a reasonable price.

Dewalt Inspection Camera. This lifesaver runs around $300 and is perfect for wiring jobs and plumbing work, as the scope gives you a visual into your wall or tubes.

PermaFlow No Mess Plunger. For about $20, put an end to squirting who-knows-what when your toilet backs up. This accordion-like sanitary bag fits around your toilet seat and creates a suction when you lift the lid, pulling whatever is stuck, out, without spraying you with… well you get it.

Lenox Hole Saw. Starting at $7, now you can efficiently cut wood and metal holes for all those projects at home. It also has a handy material release that will keep you from digging out remnants and possibly injuring yourself.


Craftsman Right-Angle Impact Driver. It’s tough getting into those tight corners. For about $80, this lightweight driver will drill holes or affix screws into tight spots, and with a mini lamp on the end, you won’t miss your mark. The battery charger is super fast, too. Within three minutes, you’ll have a 25% charge. Fully charged, you can affix 300 screws.


Grip Rite Framing Nailer. At $240, this framing nail gun is a brand new lightweight yet durable tool that will help your DIY family achieve expert precision for your next job.

Have you found any other tools you’d recommend? List them in the comments!

Friday, August 15, 2014

Garage Cleanup

They tend to become a catch-all in our homes for our miscellaneous items. No, not the basement, we’re talking about the garage. Does your garage need an overhaul? Here are some tips to help you reclaim your garage space and restore functionality.
1. Set aside time. It’s hard to find time for daunting tasks (especially those that likely contain dirt and bugs). If you can find a weekend to dedicate to the task, you’ll thank yourself in the weeks and months to come. Aim for a dry weekend and allow yourself the garage space and driveway to sort all of your items.

2. Group and label. Sorting in the following categories will help you see what can be stored elsewhere in your home: recycling, sports, automotive, seasonal décor, gardening gear, tools, and other equipment.

3. Dump or donate. If you haven’t used it in a year (discounting holiday items), you probably don’t need it taking up space in your home or your garage. Unsalvageable items can find a new home in a dumpster, while surplus items can be donated to a charity. Give AMVETS a call if you have a load ready to be picked up, or research other charitable organizations in need.

4. Determine a layout. Designate areas in your garage for certain functions. One area should be devoted to recreation, another to lawn maintenance, perhaps another for tools. Seasonal items stored in bins should be stored above everyday items on shelves so they are visible yet out of the way.

5. Storage storage storage. Invest in shelving and containers that allow you to label and see the contents within. Oftentimes, we purchase new items to replace those we think we’ve lost or misplaced. Being able to see your entire inventory will prevent such purchases. If you can hang it, hang it and keep it off the ground where it will collect dust and likely become part of a pile.

Don’t forget to keep your garage clean. A tidy garage that is swept monthly will aid in preventing unwanted clutter from gathering. Do you have other tips to share on keeping your garage clean? Share them in the comments here!

Friday, February 28, 2014

Don’t settle for an old home


Television shows like “Flip this House” or “Love it or List it” are fun to watch, and many believe they possess the true passion and expertise to renovate old homes. But in reality, it’s a much riskier game than some would lead you to think. Oftentimes with old homes, flooring jobs become structural nightmares, and creating more space in an old bathroom can mean thousands in unexpected plumbing fees.

Simply put, old homes are unpredictable, and can lead a homeowner down a never-ending path of constant work and dwindling funds.


Generally speaking, the oldest homes in America are found in the Northeast, according to a recent report by the Department of Housing and Urban Development. Interestingly, the report also revealed that New York State has the oldest median age of homes at 57 years. Houses that were built in the 50’s have their advantages (beautiful wood floors, for example), but more homeowners must invest in heavy upgrades to keep their older homes energy efficient and modern. There were less stringent structural requirements, including wiring and insulation, both of which can make a big difference not only in energy efficiency, but safety as well.

Across America, the median age home is 23 years--so why has New York fallen so far behind? Thankfully for those looking to move to Rochester from out of state or in state, Faber Homes can be a saving grace.

New York is a beautiful place to live, and Faber makes it easy to build the home of your dreams. Visit our website today to learn about our growing communities and modern floorplans: www.faberhomes.com.